Posts

Dakota Digital GSS-3000

This blog post will show you the connections that you need to make between your Infinitybox 20-Circuit Kit and the Dakota Digital GSS-3000 Universal Gear Shift Sender.  The GSS-3000 is designed to drive the gear selector indicators on your dash from any automatic transmission.  Their kit has a rotary potentiometer that connects to the shift linkage on the transmission.  It learns the position of the different gears and sends signals to indicators on your dash to show you what gear you are in.  It is a simple and clever product.  The Dakota Digital GSS-3000 has contacts that are designed to drive your back up lights when you have the transmission in reverse.  It also has a set of contacts for a Neutral Safety Switch.  This sends out a signal when the transmission is in park or neutral and it is safe to start the engine.  Your Infinitybox system can take in these two signals to easily drive your back up lights and manage your Neutral Safety Switch.  Keep reading to learn more.

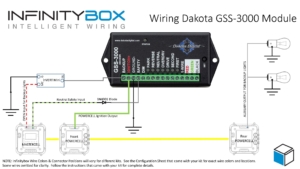
Before you go any further, it is important that you read and carefully understand the instructions for your Dakota Digital GSS-3000 Universal Gear Shift Sender.  You can download these instructions from their website by clicking here.  This blog post is only going to cover the ignition power to the GSS-3000, the neutral safety signal and the connection to the back up lights.  Please follow their instructions for the rest of the wiring to the module.  This picture will show the wiring diagram for the connections to the GSS-3000.

Picture of Infinitybox Wiring Diagram for the Dakota Digital GSS-3000

Picture of Infinitybox Wiring Diagram for the Dakota Digital GSS-3000

First, you need to provide key-on ignition power to the module.  When the key is in the run position, the module will get its power.  You’re going to tap into the ignition output on your front POWERCELL.  Check your configuration sheet for the wire color for your ignition output.  You can splice into this wire directly or you can use one of our Splice Saver Kits to make a simple and clean connection for ignition power.

Next, you can take their Back Up signal and use it to control the back up lights in the back of you car.  The advantage of doing it this way is that you’re running less wire.  The signal will come from the GSS-3000 in the front of the car and connect to the MASTERCELL, also in the front of the car.  The back up lights will get their power from the rear POWERCELL.  You are not running a wire all the way from the GSS-3000 in the front of the car to the back up lights in the rear of the car.  The GSS-3000 puts out a positive signal for the back up lights.  You need to use one of our inVERT Minis to flip this to a ground signal.  See the details in the wiring diagram for how to make these connections.

Lastly, you can use the Dakota Digital GSS-3000 to send the MASTERCELL the signal for the Neutral Safety Switch.  The MASTERCELL needs to see a ground signal through the input for the Neutral Safety Switch.  Check your configuration sheet for specifics on the wire color for your system.  This blog post will get you more details on the Neutral Safety Switch input.  In a lot of transmissions, there is a switch built into them that will give you this signal for when it is safe to start the engine.  If your transmission does not have a built-in safety switch, you can use the signal from the GSS-3000.  This is a ground signal from their SAFETY terminal.  We recommend wiring a 1N4001 diode in series with the MASTERCELL input to isolate the MASTERCELL from the GSS-3000.  This blog post will get you more details about wiring this diode in line.  When you have the transmission in the park or neutral position, the MATERCELL will get the signal that it safe to start the engine.

The is an important consideration here regarding using the GSS-3000 neutral safety signal and the Infinitybox built-in One-Button Start feature.  This feature will not work if you are taking the neutral safety signal from the GSS-3000.  Since the GSS-3000 is getting its power from the ignition output from your POWERCELL, the module will not trigger the neutral safety signal in time for the MASTERCELL to process this.  You will need to use an external neutral safety switch if you want to use our One-Button Start feature and the GSS-3000.

You can download a PDF version of this wiring diagram by clicking this link.

Our technical support team is always available to help you wire your car or truck with our Infinitybox system.  Click this link to contact our team with any questions.


Haltech ECU Wiring Diagram

Here’s the answer to a question that we get asked a lot.  Will the Infinitybox system work with my ECU or EFI system?  The answer is always, YES.  We play nicely with everyone’s fuel injection system.  We recently received this question related to the Haltech Elite 950 ECU.  This blog post is going to show you how easy it is to wire this EFI set up with our Infinitybox system.

Just like anything else, please start by reading the instructions.  This blog post is going to cover the details of wiring the Haltech Elite 950 ECU with the Infinitybox 20-Circuit Kit.  We’re going to assume that you’re running our Front-Engine configuration.  If you’re running our Rear-Engine configuration, check your configuration sheet for the specific locations of the inputs and outputs referenced in this blog post.  The Haltech part number for this ECU is HT-150700 and you can get to its details at this link.    Read and understand their instructions before you get into wiring.

This blog post is going to show you how to get ignition power to their ECU.  It will also show you how to take the cooling fan and fuel pump triggers from the ECU into the MASTERCELL.  Lastly, this blog post will show you how wire in the power to the injectors and coils so you can eliminate the need for external relays.

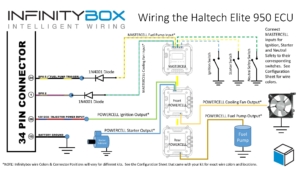
This diagram will show you the connections that you will make between your Infinitybox system and the Haltech ECU harness.

Haltech ECU Wiring Diagram with Infinitybox Control

Haltech ECU Wiring Diagram with Infinitybox Control

To start, the ECU needs to be grounded.  You need to take the black wire going to terminal 10 on the 34-pin connector and ground that.  This should be through a metal-to-metal connection to the chassis.  There should be no dirt, grease, oil, paint, rust, powder coating or anything else in this connection.

Next, the ECU needs key-on-power.  This power should be on when the key is in the run and start position.  You are going to get this power from the Ignition output on your POWERCELL.  In most kits, this is output 3, the green wire, on the front POWERCELL.  Check your configuration sheet for the wire colors for your specific kit.  Since your POWERCELLs manage all of the high-current switching in your electrical system, you do not need external relays to control your fuel injection system.  Connect your Ignition output from your POWERCELL to the “12V ECU” wire going to terminal 26 on the ECU harness.  This is the red wire with the blue tracer.

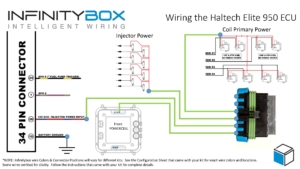
You can bring ignition power to the coils and the injectors from the Ignition output on your POWERCELL.  You can splice these wire together, use a terminal block or use our Splice Saver kit to make a reliable and sealed connection.  This diagram will show you how to connect the Splice Saver kit to your ignition output, the coils and the injector.

Infinitybox wiring diagram showing Haltech Key-On Power Wiring Details

Infinitybox wiring diagram showing Haltech Key-On Power Wiring Details

Next you are going to connect the outputs on the Haltech ECU for the fuel pump and the cooling fan to their inputs on the MASTERCELL.  Haltech dedicates DPO 5 for the fuel pump.  You can connect that to your MASTERCELL Input for your fuel pump.  We strongly recommend isolating the MASTERCELL from the ECU with a 1N4001 diode.  The orientation of this diode is very important.  Refer to the diagram above to show proper orientation of the anode and cathode of this diode.

You can use any of the other digital outputs on the Haltech ECU to trigger the MASTERCELL input for the cooling fan.  You must isolate the ECU from the MASTERCELL using a 1N4001 diode like the fuel pump.  We chose DPO 2 in our diagram.  You can use any of the available digital outputs however you must set them up correctly in their programming application.

Please note that you cannot pulse the DPO signal from the ECU that goes into the MASTERCELL for the fuel pump or the cooling fan.  These should be on and off signals to turn the pump and fan on and off.

You can download a PDF version of our wiring diagram for the Haltech Elite 950 ECU by clicking this link.

You can contact our technical support team with any questions by clicking this link.

Reverse Lockout Solenoid

A customer just sent us pictures showing how he wired a switch into his transmission shifter to control his reverse lockout solenoid.  He wanted to make sure that he couldn’t accidentally shift into reverse when he was in the upper gears.  By using our Infinitybox wiring system, he was able to easily control this solenoid.

Ed K. is building a 1968 Pro-Touring Mustang fastback.  He has transplanted a Coyote engine from a 2014 Mustang and mated it to a Tremec T56 6 speed transmission, feeding a Ford 9 inch rear end for the drivetrain.  He is using our 20-Circuit Kit with inLINK, inRESERVE and inMOTION to wire his car.

The Tremec transmission is outfitted with a solenoid lockout feature that further pre-loads an already compressed spring acting on the shift gate to prevent accidentally engaging reverse while downshifting from 6th gear to 5th gear, which would be catastrophic. In order to engage reverse, when desired, this solenoid must be energized to remove this extra spring pre-load. Typically, this solenoid is energized by a body controller when the car is moving at 5 miles per hour or less to allow a shift into reverse. Ed wanted a simpler way to engage this reverse lockout solenoid in his 1968 Mustang.

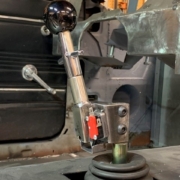
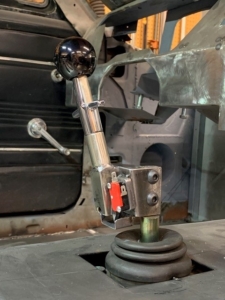
Ed modified the shift lever to add a microswitch to it.  When he pulls up on the shifter handle, the switch closes.  He can use this switch to control his reverse lockout solenoid.

Ed picked the OPEN output on his front POWERCELL to power his reverse lockout solenoid.  The OPEN outputs on your configuration sheet can be used for practically anything.  They are auxiliary outputs for any additional electrical accessories that you may have on your car.  Click on this link to learn more about OPEN outputs.

Ed connected this open POWERCELL output wire to the solenoid, then grounded the other side of the solenoid wiring.

Next, Ed found the MASTERCELL input that corresponds to the OPEN output that he used.  Your configuration sheet shows you which input and output wire colors go together.  Ed connected this MASTERCELL input to the normally open terminal on his shifter switch.  Then he connected the common terminal of the switch to ground.  When he pulls up on the reverse handle, the switch closes.  This connects the MASTERCELL input to ground.  The MASTERCELL sends a command to the front POWERCELL to turn on the output, which energizes the reverse lockout solenoid.  This pulls back the reverse gate, which lets him shift into reverse.  Here is a simple wiring diagram showing how this was connected.

Picture of simple schematic showing how to control a reverse lockout solenoid with the Infinitybox system.

Picture of simple schematic showing how to control a reverse lockout solenoid with the Infinitybox system.

Ed was able to wire his reverse lockout solenoid easily with our Infinitybox system.  He didn’t have to add any relays to his car to do this.  He was able to use the flexibility and expandability of our system to get what he needed in his car.

You can download a PDF version of this wiring diagram by clicking this link.

Click on this link to learn more about what the Infinitybox system can do for your restoration, street rod, resto-mod, kit car or pro-touring build.


The Dakota Digital PAC-2800BT

Dakota Digital PAC-2800BT Cooling Fan Controller

This blog post is going to show you how to use the Dakota Digital PAC-2800BT to control your cooling fan with the Infinitybox system.  The PAC-2800BT is a powerful controller that lets you program the temperatures that turn on and turn off your cooling fans.  You have the flexibility to use any temperature sender, take in OBDII data from a modern ECU, even interface with the VHX & RTX gauges.  We’ve blogged before about wiring the VHX and RTX gauges with the Infinitybox system.  Click on the links to learn more.

There are multiple advantages to using the Infinitybox system with the Dakota Digital PAC-2800BT controller.  First, you can eliminate the external relay and the fuse.  These are built into the POWERCELL.  Next, you can streamline your wiring.  The PAC-2800BT would be located behind your dash, near the MASTERCELL.  The power for the fans comes from the front POWERCELL, which is located strategically where you need it in the car.  Lastly, the POWERCELL has the ability to soft-start the cooling fan.  This decreases the in-rush current to the fan and lets you drive a larger fan with a smaller gauge of wire.  You can read more about this at this link.

As always, we strongly encourage you to read and understand the manuals for anything that you are installing in your car.  Dakota Digital has a very detailed manual for the PAC-2800BT.  You can access it by clicking this link.  Also, this blog post is going to cover the wiring between the Infinitybox system and the PAC-2800BT.  This includes ignition power, the cooling fan triggers to the MASTERCELL and the cooling fan output from the POWERCELL.  Follow the Dakota Digital instructions for wiring battery power, ground, the temperature sender and the other optional features of the PAC-2800BT.

The following picture shows the connections between the Infinitybox MASTERCELL and the POWERCELL for the PAC-2800BT.

Picture of a wiring diagram showing how to wire the Dakota Digital PAC-2800 BT with the Infinitybox 20-Circuit Kit

Picture of a wiring diagram showing how to wire the Dakota Digital PAC-2800 BT with the Infinitybox 20-Circuit Kit

First, you need to get ignition or key-on  power to the PAC-2800BT.  This is going to come from the POWERCELL output for the ignition.  This is output 3, the light-green wire on the front POWERCELL in most systems, .  Please check your specific configuration sheet to confirm.  You can going to bring this ignition power to the IGNITION terminal on the PAC-2800BT module.  You are going to tap off your POWERCELL ignition output to get this power.  You can splice into this wire or you can use our Splice Saver kit to create an ignition junction point.

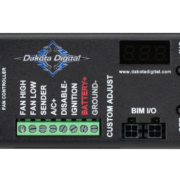
Next, you are going to connect your MASTERCELL cooling fan inputs to the triggers on the PAC-2800BT.  In most systems, your cooling fan is input 10, which is the blue wire with the green tracer.  Check your configuration sheet to confirm.  If you are using only one cooling fan, Dakota Digital tells you to use the FAN LOW terminal on the PAC-2800BT.  We strongly recommend that you install a diode in-line between the MASTERCELL and the PAC-2800BT.  This should be a 1N4001 diode that can be purchased easily from Amazon.  The orientation of this diode is critical and the system will not work correctly if it is wired backwards.  The diode lead on the side with the stripe should be connected to the PAC-2800BT.

Lastly, you are going to connect your POWERCELL output for the cooling fan to the wires on the fan motor.  The other wire on the fan motor should be connected to a good chassis ground.   This link will get you more details on wiring the cooling fan with the POWERCELL output.

The PAC-2800BT gives you the option to control two separate cooling fans.  If you want to use a second cooling fan, you would simply repeat wiring an unused MASTERCELL input to the PAC-2800BT and an OPEN POWERCELL output to your second cooling fan.  In most of our kits, output 8 on the front POWERCELL can be used as an auxiliary output.  You can use this one to power your second cooling fan.  See your specific configuration sheet for more details.

Here is how all of this works.  The PAC-2800BT takes in the temperature data from the temperature sender, the Dakota Digital gauge controller or the ECU via OBDII.  If the temperature it reads goes higher than the value that you programmed in it, it grounds the MASTERCELL input for the cooling fan.  This turns on the cooling fan input.  The MASTERCELL sends a command to the POWERCELL in the front of the car to turn on the output for the cooling fan.  When the temperature drops below the set point that you programmed in the PAC-2800BT, it turns off the MASTERCELL input for the cooling fan.  The MASTERCELL sends a command to the front POWERCELL to turn off the fan.  It is that easy.

If you choose the option to use two cooling fans, the PAC-2800BT will manage both fans together to control the engine temperature.

There is a PDF copy of this wiring diagram available on our website.  Click this link to download it.

Give our team a call at (847) 232-1991 if you have any questions about wiring the Dakota Digital PAC-2800BT with our Infinitybox system.  You can also contact our team directly by clicking this link.

Jeep CJ7 Wiring Series- POWERCELL Locations

Over the next few videos, we’re going to continue our theme on good planning.  Specifically, we’re going to talk about picking the best locations for the major components that come with your Infinitybox system.  We’re installing our 20-Circuit Kit with inLINK and inRESERVE in our 1979 CJ7.  To get the most out of our install, we want to pick the best locations for the MASTERCELL, the front & rear POWERCELLs, the MEGA fuse holder and the inRESERVE solenoid.  We’ve broken this up into 5 different videos, talking about what you need to consider for each part.  This video covers picking the best locations for your front & rear POWERCELLs.

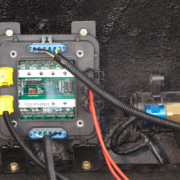
Side View of the Infinitybox POWERCELL

Side View of the Infinitybox POWERCELL

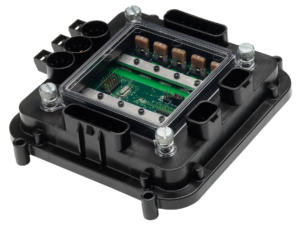
You get two POWERCELLs in your 20-Circuit Kit.  One for the front of your car and one for the rear.  The POWERCELLs are the remote fuse & relay boxes for your system.  They get commands sent to them from the MASTERCELL and they do the actual switching for all of your lights, ignition, starter, fuel pump, cooling fan, horn and other accessories.  You can learn more about the POWERCELL by clicking this link.

There are two important things to consider when you’re picking the best locations for your POWERCELLs.  First, you want the POWERCELLs as close to your electrical loads as possible.  This keeps the wiring short and makes it easy to install.  Your front POWERCELL is going to power your headlights, high-beams, turn signals, parking lights, ignition, starter, horn and dash.  You want to keep the front POWERCELL close to these loads to keep the wiring short.  Your rear POWERCELL is going to power your brake lights, turn signals, reverse lights, running lights, fuel pump and any audio that you have in the back of your car.

The other thing to consider when you pick your POWERCELL locations is that your POWERCELLs are the remote fuse boxes.  You need to have reasonable access to the POWERCELL to remove the protective cover and change the fuses.

In our 1979 Jeep CJ7, we’re going to mount the front POWERCELL on the inner driver’s fender.  There is a nice flat spot there to make mounting easy.  It is accessible for maintenance.  The 8-AWG power cables can be easily routed across the firewall to connect to the battery and the runs of wires to the loads are all relatively short.  Check out more detail on the location in this video.

We’re going to mount the front POWERCELL inside the rear passenger fender.  We will fabricate an enclosure inside the fender that is outside the travel for the suspension.  We’ll make a sealed cover over the enclosure so we can get to it easily for maintenance.  We can easily run the 8-AWG power feeds and the CAN cable down the passenger side of the Jeep.  Finally, the runs of wires to the brake lights, turn signals, running lights, reverse lights and fuel pump are all relatively short.  Check out more detail on the location in this video.

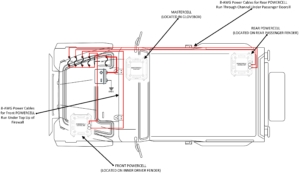
We created this simple diagram to show the POWERCELL locations in the Jeep plus the primary power cables from the battery, through the inRESERVE solenoid and through the Mega fuse holders.  You can download a PDF copy of this diagram by clicking this link.

Infinitybox Jeep CJ7 Wiring Diagram- Cell Locations and Primary Power Routing

Infinitybox Jeep CJ7 Wiring Diagram- Cell Locations and Primary Power Routing

Picking the best locations for your POWERCELLs will make your wiring simple and efficient.  It will also make troubleshooting and diagnostics easier.  Keep watching for more in our 1979 Jeep CJ7 Install Series.

Be sure to subscribe to our YouTube channel and click the bell icon so you get notified when we post new videos in the series.

Click on this link to get to the main page for the 1979 Jeep CJ7 wiring project.  You can find all of the videos on one place there.  

You can also click here to contact our technical support team with any questions about your car or truck wiring project.  


POWERCELL

Our 20-Circuit Kit is the core to the electrical system in your car.  It is more than just a wiring harness.  It is a universal wiring system that gets you the most advanced, functional and reliable electrical control on the market.  The 20-Circuit Kit starts with our MASTERCELL, which connects to your switches.  It also includes two of our POWERCELLs, which we call the muscles of your system.  The MASTERCELL sends commands to the POWERCELLs to locally power your lights, ignition, starter solenoid, cooling fans, fuel pumps, horn and other accessories.  We’ve talked about the MASTERCELL in more detail in a recent blog post.  You can link to that here.  This post is going to cover more details about our POWERCELL.

The 20-Circuit Kit includes 2 POWERCELLs.  Each POWERCELL can control 10-outputs.  One POWERCELL is for the front of the car, the second is for the rear of the car.  The front POWERCELL is set up to control your headlights, high-beams, turn signals, front running lights, horn, cooling fan, ignition power, starter solenoid and dash power.  The rear POWERCELL is set up to control your rear running lights, turn signals, brake lights, fuel pump, back-up lights, dome lights and other accessories.

Connecting your loads to the POWERCELL is very easy.  You run the output harness from the POWERCELL to your light, fan, pump or other accessory.  You cut our universal harness to length.  You connect our output wire to the wire on your load.  That’s it.  Click on this link to get more details on connecting your POWERCELL outputs to the electrical loads in your car or truck.

You put the POWERCELLs in the car were you need them.  This lets you eliminate size and weight of the wiring harness in your car.  The installation is simpler because the runs of wire are shorter and troubleshooting is easier.

The POWERCELL is a remote fuse and solid-state relay box.  The fuses that you need to properly protect your wiring harness are built into the POWERCELL.  You do not need to add separate fuses.  Also, the solid-state relays that control your loads are built into the POWERCELL.  Each output can carry up to 25-amps continuously so you do not need to add external relays to control your lights, fans, pumps and other accessories.  Also, we don’t use mechanical relays in our POWERCELLs.  Our outputs are controlled by solid-state MOSFETs.  This are rugged and reliable and give you tons of benefits over traditional relays.  Check out this link to learn about some of the advantages of a MOSFET.

This video walks through more of the details of the Infinitybox POWERCELL.

You can easily add extra POWERCELLs to your 20-Circuit Kit if you need to expand the output capacity beyond 20.  Each additional POWERCELL gives you 10 more outputs to your Infinitybox system.  The POWERCELL kit includes the POWERCELL plus all of the harnessing required to connect to your existing 20-Circuit Kit.  You can learn more about the POWERCELL kit by clicking this link.

We have the solid model for the POWERCELL available to our customers to help with their planning and mocking up process.

If you want to purchase our Infinitybox system or have technical questions, you can click on this link to contact our team.

POWERCELL Output

Now it is time to connect the POWERCELL outputs to your loads in the car.  When we talk about loads, we refer to the things that you need to power to make the car work.  These include your headlights, turn signals, ignition systems, starter solenoids, fuel pumps, cooling fans, horns, lights, etc.  All of these loads are going to the connect to each POWERCELL output to get their switched battery power.

This post is going to cover the basics of wiring the POWERCELL outputs.  We will publish several specific posts that will go through the details of how to wire your turn signal outputs, wiring your ignition and starter, wiring cooling fans and other loads.

The automotive electrical system uses a grounded chassis.  This means that each load gets its switched power from some power distribution device.  In your case, it is your POWERCELL.  Current flows from the POWERCELL to the load.  To complete the circuit, the load needs to get connected to ground, which is typically your chassis.  The chassis is connected to the negative post of the battery.  This is how the circuit is completed in your system.

Another thing to remember about your Infinitybox system is that the switches connect to the MASTERCELL.  Your loads connect to the POWERCELLs.  There is no connection between the switch and the load.  That connection comes from a data command sent from the MASTERCELL to the POWERCELLs.  When you turn on a switch, the MASTERCELL tells the POWERCELL to turn on an output.

Your kit includes an A & B output harness for each POWERCELL.  If you have our 10-Circuit Kit with one POWERCELL, you have one each of the A & B harnesses.  If you have our 20-Circuit Kit with two POWERCELLs, you will have two of each.

This picture shows you the POWERCELL A output harness.  It has the wires for outputs 6 through 10.

POWERCELL A Output Harness

POWERCELL A Output Harness

This picture shows you the POWERCELL B output harness.  It has the wires for outputs 1 through 5.

POWERCELL B Output Harness

POWERCELL B Output Harness

Yes, we get that it seems that the A & B designations are reversed for these harnesses.  That designation came from the original layout of the POWERCELLs from our early beginnings.  These designations have stuck and changing over a decade of documentation would be tough.

Please note that the A & B connectors are interchangeable in the POWERCELL output sockets.  A lot of initial problem calls that we get from customers come from the fact that they have these harnesses reversed.  Make sure that you are plugging the correct harness into the correct socket.  The manual that came with your kit shows you the correct orientation.  This picture also shows which connector socket is A & B.

Illustration of Infinitybox POWERCELL labeling output connectors

Illustration of Infinitybox POWERCELL labeling output connectors

Once you get the connectors plugged into the correct sockets, you need to properly ground the POWERCELLs.  Each of of the output harnesses have a black wire.  Both of these black wires need to get grounded to the chassis.  This is to properly ground the electronics in the POWERCELL.  Make sure that you have a good metal-to-metal connection between these ground wires and the chassis.  You must make sure that you remove all dirt, rust, oil, grease, paint and powder coating from this connection.

Next, it is time to start connecting the POWERCELL output wires to the loads in the car.  Remember that your configuration sheet is your road map to do this.  You can review our previous blog post about the configuration sheet as a refresher by clicking this link.  The configuration sheet is going to identify the specific POWERCELL output wire by color for each load in the car.

You are going to run the POWERCELL output to the load.  From there you must connect the POWERCELL output wire to the wiring on your light, fan, horn, fuel pump, etc.  There are many different ways to do this.  People will argue advantages of one method over another.  If done correctly with the right tools, they are all good methods.

One of the easiest ways is to butt splice the POWERCELL output wire to the wire on your load.  For example, you cooling fan will probably have two wires coming from the motor housing.  You can use a butt splice connector to connect the POWERCELL output wire to the wire on the fan motor.  This picture shows an example of a butt-splice.

Picture showing example of splicing wires in our 1967 Mustang Install of the Infinitybox wiring system.

Picture showing example of splicing wires in our 1967 Mustang Install of the Infinitybox wiring system.

The team at Waytek Wire have a great post on their blog called “Splice Connectors 101”.  In this article, they walk you through the basics of splicing wires together.  Click here to read this article. 

What is important is that you use the correct crimp tool and you properly seal the joint.  This seal can be done with heat shrink tubing or you can use butt crimp connectors that already have a heat-shrink jacket over them.  Companies like Waytek and Del City are great sources for the right tools and materials.

Another option is to solder the wires together.  A lot of customers swear by this method or a combination of butt-splicing and soldering.  The advantage is that you get a metallurgical connection between the copper strands of both wires.  Some will argue that this is stronger and more reliable than a pure mechanical crimp of a butt-splice.  Just like the butt-splice mentioned above, this joint must be sealed preferably with heat shrink.  The only warning with soldering is that if too much solder is applied to the joint, it can wick up the strands of the wire flowing away from the joint.  This wicking can make the wire more rigid and susceptible to fatiguing if the joint is stressed mechanically.  Just watch the amount of solder that you are applying to the joint.

The last is to put connectors on both ends of the connection.  This is the most time consuming and costly, but it has advantages down the road if you need to remove the load for maintenance.  There are many different options for connection systems.  Deutsch connectors are very popular in racing.  They are rugged, durable and proven.  Delphi Weatherpack connectors are another option.  They have been proven in the field for decades and are a cost effective option.  You can purchase Weatherpack kits from many different sources that include the proper tools to crimp the terminals.  Here is an example of a Weatherpack kit that includes the tool.

If the POWERCELL output harnesses are not long enough, you can easily extend them using any of the connection methods mentioned above.  You must make sure that you use the right size of wire and the right insulation type.  We use 14-AWG wire for all of the POWERCELL outputs.  This will carry 32-amps continuously, which is very conservative for most aftermarket and racing applications.  We use wire with TXL insulation.  This is a cross-linked wire designed for the automotive environment.  It is oil, dirt, chemical and abrasion resistant.  You can source extra 14-AWG TXL wire at this link.  We can also create custom harness lengths.  Contact our sales team for details.

Just a few last comments about wiring the POWERCELL outputs.  Stay away from Home Depot.  We say this as a joke but it is important.  The same materials that you’d use to wire a house have no place in the car.  That means no wire nuts, extension cords or electrical tape to make connections.  Use only tools and materials that are designed to handle the automotive environment in your car.

Keep watching for the next posts that will detail wiring POWERCELL outputs to some of the specific systems in your car.  If you have any questions, please click on this link to contact our team.

Infinitybox System Benefits

We got an email from a customer who is wiring their Factory Five 1933 Hot Rod with our Infinitybox 20-Circuit system and inMOTION.  He had two question that were very easy for us to answer.  After answering them, we realized that they highlighted two of the most important advantages of the Infinitybox system and we thought that they were worth blogging about.

First, he wanted to use a large air-horn to replace the squeaky anemic one that he originally had in the car.  The new horn came with a harness that included a relay and fuse holder.  His first question was whether or not he could wire the POWERCELL output to the horn directly and eliminate the harness that came with the horn kit.  The answer is yes.  The POWERCELL incorporates the relay and fusing functions all in one box.  As we’ve blogged about before, we don’t use electromechanical relays, we use solid-state devices called MOSFETs.  Each of our POWERCELL outputs are designed to carry up to 25-amps continuously.  Since the harness that came with the horn had a 20-amp fuse in it, he could easily power the horn directly from the POWERCELL.  This eliminated all of the extra parts that came with the horn.  The same would be true for fuel-pump harnesses, cooling fans and many other electrical add-on accessories.  The POWERCELL eliminates the need for external relays and fuse holders.

The second question was related to adding a new electrical accessory to his car.  He has most of the car completely wired with our Infinitybox 20-circuit harness.  He has all of the CAN cables run, the POWERCELL power feeds are connected to the battery, the MASTERCELL inputs are wired to the switches and he has the POWERCELL outputs connected to his loads.  He has everything loomed up and it looks really good.

He jus realized that he wanted to add a linear actuator to drive his emergency brake.  His question was whether or not he could use an open pair of outputs from inMOTION to drive this actuator forward and back.  The answer is yes and look at what it saved him.

  1. Just like the horn above, he can drive the actuator directly from the inMOTION cell.  inMOTION reverses polarity internally so that means that he can eliminate the relays that came with the kit for the actuator.  It also means that he can use any switch to engage or disengage his emergency brakes.  A single input on the MASTERCELL engages and another disengages.  This means that he doesn’t need to use any special switches to change direction of the actuator.
  2. More importantly, he can leverage the existing system that he has in the car.  As long as he has open outputs on a POWERCELL or an inMOTION cell, he can easily wire them to his added accessory without having to run more wire through the car.  Since he’s pretty much done with the wiring, this saved him tons of time fishing additional wires through the car.  He simply connected the outputs from inMOTION to the linear actuator and connected the corresponding MASTERCELL inputs to his switches, and he was done.  He didn’t even need to update his code.

We hope that these two simple examples highlight some of the benefits of our Infinitybox system and show how our system stands out against traditional wiring harnesses.

If you want to learn more about how the Infinitybox system can help you wire your car, give us a call at (847) 232-1991 or email us at sales@infinitybox.com.  Click this link to contact our team directly.

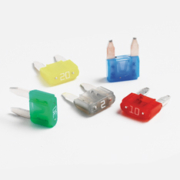
Picture of the Littelfuse Minifuse

Why A Fuse?

We get this question a lot.

Why do the POWERCELL and inMOTION cells use fuses to protect the outputs?  Some say that we’re already using smart MOSFETs, why not rely on them to protect against over-current on the output wires?  Others ask, why not use circuit breakers?  There are several important and practical reasons why we rely on a traditional fuse to protect the outputs on our Infinitybox hardware.

With respect to MOSFETs, they are tried and true technology.  They are used in practically every application for switching and current control.  The MOSFETs used in the POWERCELLs are automotive-grade and designed to carry up to 270-amps.  The chances of them failing in a typical customer car are minute.  However, if a MOSFET fails, it doesn’t fail gracefully.  If a MOSFET were to fail, it fails resistive.  That means that they are going to generate a significant amount of heat, quickly.  No intelligence built into the circuitry can interrupt the current flow if the silicon die in the MOSFET package has become a resistor.  In that case, the fuse is your last line of defense to protect the system from thermal runaway.

You can use the same logic for inMOTION.  It has sensors on the board that monitor the total amount of current flowing out to the load.  inMOTION already shuts off the relay coils when it sees too much current, why not rely on that alone without the fuses?  The practical reality is that a common failure mode for relays is for the contacts to weld together, especially in inductive motor application.  If this were to happen, no intelligence on the inMOTION board can open the circuit.  Again, the fuse becomes the last line of defense.

With the above being said, you can see the need for some circuit protection component in the system if other components fail.  That leads to the debate between fuses and circuit breakers.  Circuit breakers can certainly do the job, however a fuse will out perform a breaker in all categories.

  1. Fuses are more cost effective than circuit breakers.
  2. Fuses are smaller and package better than circuit breakers.
  3. Fuses have better low-overload protection characteristics than circuit breakers.  This is very important in cases of resistive shorts like a failed MOSFET.
  4. Fuses respond quicker than circuit breakers under short-circuit conditions.

Most importantly, a fuse drives better end user behavior than a circuit breaker.  At the end of the day, there is a reason why a fuse opens or a breaker trips.  A motor has failed.  Insulation on a wire has shorted to ground.  An electronics module has failed.  In all these cases, you do not necessarily want to blindly reset a breaker and keep on driving.  The cause of the over-current condition needs to be identified and fixed before resuming normal operation of the vehicle or equipment.  Otherwise, more severe thermal events can occur in the wiring harness causing damage or injury.

See our blog for additional posts on proper fusing and other circuit protection lessons.  If you have any questions, reach out to our power distribution experts at (847) 232-1991 or email our team at sales@infinitybox.com.  You can also click this link to contact our team directly.