Posts

Haltech ECU Wiring Diagram

Here’s the answer to a question that we get asked a lot.  Will the Infinitybox system work with my ECU or EFI system?  The answer is always, YES.  We play nicely with everyone’s fuel injection system.  We recently received this question related to the Haltech Elite 950 ECU.  This blog post is going to show you how easy it is to wire this EFI set up with our Infinitybox system.

Just like anything else, please start by reading the instructions.  This blog post is going to cover the details of wiring the Haltech Elite 950 ECU with the Infinitybox 20-Circuit Kit.  We’re going to assume that you’re running our Front-Engine configuration.  If you’re running our Rear-Engine configuration, check your configuration sheet for the specific locations of the inputs and outputs referenced in this blog post.  The Haltech part number for this ECU is HT-150700 and you can get to its details at this link.    Read and understand their instructions before you get into wiring.

This blog post is going to show you how to get ignition power to their ECU.  It will also show you how to take the cooling fan and fuel pump triggers from the ECU into the MASTERCELL.  Lastly, this blog post will show you how wire in the power to the injectors and coils so you can eliminate the need for external relays.

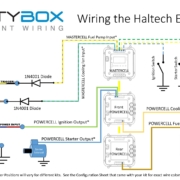
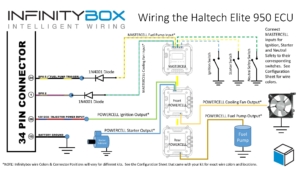
This diagram will show you the connections that you will make between your Infinitybox system and the Haltech ECU harness.

Haltech ECU Wiring Diagram with Infinitybox Control

Haltech ECU Wiring Diagram with Infinitybox Control

To start, the ECU needs to be grounded.  You need to take the black wire going to terminal 10 on the 34-pin connector and ground that.  This should be through a metal-to-metal connection to the chassis.  There should be no dirt, grease, oil, paint, rust, powder coating or anything else in this connection.

Next, the ECU needs key-on-power.  This power should be on when the key is in the run and start position.  You are going to get this power from the Ignition output on your POWERCELL.  In most kits, this is output 3, the green wire, on the front POWERCELL.  Check your configuration sheet for the wire colors for your specific kit.  Since your POWERCELLs manage all of the high-current switching in your electrical system, you do not need external relays to control your fuel injection system.  Connect your Ignition output from your POWERCELL to the “12V ECU” wire going to terminal 26 on the ECU harness.  This is the red wire with the blue tracer.

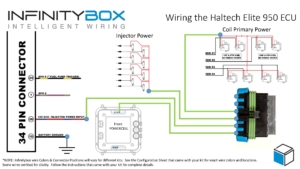
You can bring ignition power to the coils and the injectors from the Ignition output on your POWERCELL.  You can splice these wire together, use a terminal block or use our Splice Saver kit to make a reliable and sealed connection.  This diagram will show you how to connect the Splice Saver kit to your ignition output, the coils and the injector.

Infinitybox wiring diagram showing Haltech Key-On Power Wiring Details

Infinitybox wiring diagram showing Haltech Key-On Power Wiring Details

Next you are going to connect the outputs on the Haltech ECU for the fuel pump and the cooling fan to their inputs on the MASTERCELL.  Haltech dedicates DPO 5 for the fuel pump.  You can connect that to your MASTERCELL Input for your fuel pump.  We strongly recommend isolating the MASTERCELL from the ECU with a 1N4001 diode.  The orientation of this diode is very important.  Refer to the diagram above to show proper orientation of the anode and cathode of this diode.

You can use any of the other digital outputs on the Haltech ECU to trigger the MASTERCELL input for the cooling fan.  You must isolate the ECU from the MASTERCELL using a 1N4001 diode like the fuel pump.  We chose DPO 2 in our diagram.  You can use any of the available digital outputs however you must set them up correctly in their programming application.

Please note that you cannot pulse the DPO signal from the ECU that goes into the MASTERCELL for the fuel pump or the cooling fan.  These should be on and off signals to turn the pump and fan on and off.

You can download a PDF version of our wiring diagram for the Haltech Elite 950 ECU by clicking this link.

You can contact our technical support team with any questions by clicking this link.

Sample picture of the FAST XFI 2.0 Fuel Injection Controller

FAST XFI 2.0 Wiring

Electronic Fuel Injection systems have completely changed the way guys control their engines in resto-mods, street rods, kit cars and Pro-Touring builds. All the new systems are simple to install, can control hundreds of horse power and automatically tune themselves. Fuel Air Spark Technology (FAST) has been one of the most significant innovators in the area of EFI systems for the restoration and performance markets. Our Infinitybox plays nicely with any EFI system on the market including the full range from FAST. This blog post will show you how to integrate their FAST XFI 2.0 system with our Infinitybox 20-Circuit Kit.

This blog post is going to walk you through the details of wiring your FAST XFI 2.0 EFI system with our Infinitybox system. Specifically, we’re going to talk about wiring primary power, wiring ignition power, wiring the fuel pump trigger and wiring the cooling fan trigger. All of the rest of the connections between the FAST XFI 2.0 and the engine are covered in their instructions. Please carefully read and thoroughly understand the manual for your EFI system before you go any further. The manual and wiring diagrams for the XFI 2.0 are built into their tuning software package. You can download that by clicking this link.

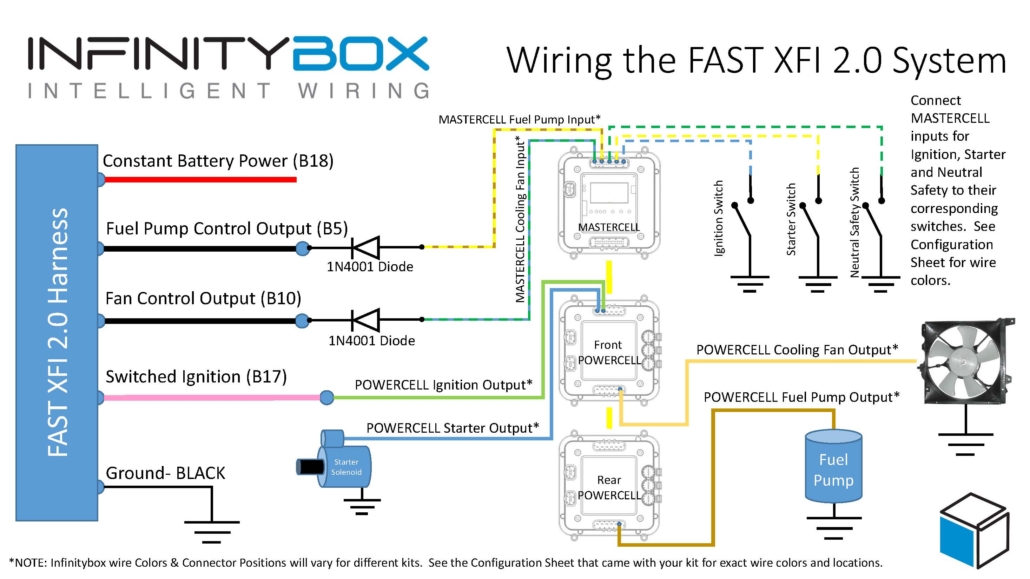
The following wiring diagram shows all of the connections between the FAST XFI 2.0 and the Infinitybox system.

Picture of a wiring diagram showing the connections between the FAST XFI 2.0 and the Infinitybox System.

Picture of a wiring diagram showing the connections between the FAST XFI 2.0 and the Infinitybox System.

Just like most other electrical systems in your car, the XFI 2.0 needs constant 12-volt power from the battery. This connection is the red wire going to cavity B18 in their harness. This wire must be connected directly to the positive terminal on your battery. It is also highly recommended that you have a fuse protecting this wire. The FAST manual recommends a 3-amp fuse in-line between the battery and the XFI 2.0 controller.

Next, you need to provide ignition power to the XFI controller. When your key is in the run position, the Infinitybox system will provide switched ignition power to the XFI controller so that it will control your engine. This ignition power will come from the ignition output from one of your POWERCELLs. Please check the configuration sheet that came with your specific kit to validate the POWERCELL output and wire color. Your POWERCELL output for ignition is going to connect to the Switched Ignition wire on the XFI harness. This is the pink wire going into cavity B17. There is no need to add a fuse to protect this wire since the fuse for it is built into the POWERCELL.

The FAST XFI 2.0 system is smart enough to signal for the cooling fan and fuel pump when it senses that it needs them. You can connect these signals to your Infinitybox MASTERCELL so that your POWERCELLs will control your cooling fans and fuel pump directly. Wiring it this way saves you in the amount of wire you need to run and also eliminates the need for extra relays. Our POWERCELLs have the solid-state relays built into them.

The FAST XFI 2.0 is set up to ground trigger relays for the cooling fan and fuel pump. This is ideal because the MASTERCELL inputs work on ground triggers. We still highly recommend installing diodes between the MASTERCELL and the XFI controller to buffer your Infinitybox system from any stray voltage that could be on the cooling fan and fuel pump triggers. We recommend a 1N4001 diode. These can be purchased from Amazon. The orientation of the diode is very important. If they are installed backwards, the triggers will not work. Please see the orientation in the wiring diagram above. The anode side of the diode should be connected to the MASTERCELL input. The cathode should be connected to the trigger wire on the XFI 2.0 controller.

Your MASTERCELL input wire for the cooling fan will connect to the Fan Control Output wire on the FAST harness. This is the black wire at cavity B10. The 1N4001 wire should be installed per our wiring diagram.

Your MASTERCELL input for the fuel pump trigger will connect to the Fuel Pump Control Output on the FAST harness. This is the black wire at cavity B5 on the FAST harness. Just like the cooling fan input, the diode should be wired per our wiring diagram.

Once you have made these connections to the FAST XFI 2.0 system, follow the manual that came with your 20-Circuit Kit to make the rest of the connections to your ignition switch, starter solenoid, cooling fan and fuel pump.

As you can see, our Infinitybox 20-Circuit is a versatile and power wiring harness system. We can easily interface with any electrical component in your car or truck build. You can download a PDF of this wiring diagram by clicking this link.

Click on this link to get in touch with our technical support team to answer any additional questions about wiring your FAST XFI 2.0 electronic fuel injection system.

MS3Pro EVO ECU

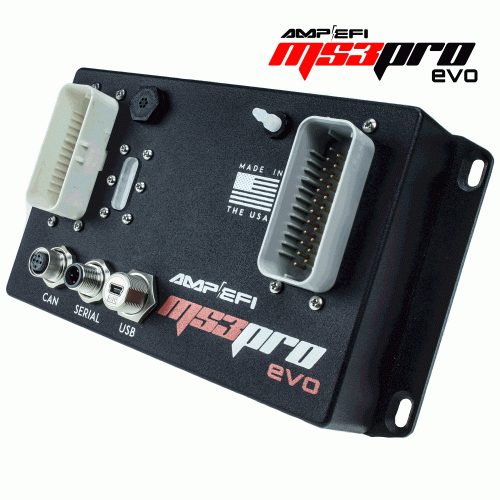
Here’s another post showing you how to connect your Infinitybox wiring system to a popular EFI system.  We had a customer ask about wiring the MS3Pro EVO ECU with our Infinitybox 20-Circuit Kit.  This is a very powerful engine management system that can be easily connected to Infinitybox.

MS3Pro ECU

MS3Pro ECU

Just like any other ECU, you must thoroughly read and understand the manual that comes with the hardware.  AMP/EFI has a very comprehensive manual that covers all of the details of this ECU.  You can download that by clicking this link.  The other important thing to note about this blog post is that we are only showing how to connect the Infinitybox system to the MS3Pro EVO ECO.  This includes the wiring for ignition power, the cooling fan trigger and the fuel pump trigger.  Consult their manual for the rest of the engine wiring.

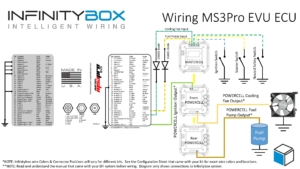
This picture shows the details of wiring the ignition power from your POWERCELL and the MASTERCELL inputs for the cooling fan and fuel pump.

Picture of wiring diagram for MS3Pro EFI system and the Infinitybox system.

Picture of wiring diagram for MS3Pro EFI system and the Infinitybox system.

There are multiple grounds in the MS3Pro EVO ECU harness.  You must have a solid, metal-to-metal connection to ground for all of these wires.

From there, the ECU needs key on power from the ignition.  Consult the configuration sheet that came with your system for the proper POWERCELL output wire for your ignition.  That will connect to terminal 25 on the White Connector on their ECU.  See their documentation for more details.

The ECU is set up to ground switch a relay for the fuel pump.  You can connect your fuel pump input to the MASTERCELL to this pin on their ECU.  You must install a blocking diode to isolate the MASTERCELL from the ECU.  See our wiring diagram for the wire details and for the orientation of the diode.  Improper installation of this diode will make this inoperable.

You can also program the MS3Pro EVO ECU outputs to control the fuel pump.  These outputs are ground switched so they can be wired in a similar way to to the fuel pump.  Just like the fuel pump, you must install a blocking diode between the ECU and the MASTERCELL.  See our wiring diagram for wire details and diode orientation.

For both the cooling fan and the fuel pump, you must not program the ECU to pulse-width modulate these outputs.  They must either be on or off.

You can download a copy of this wiring diagram by clicking on this link. 

Please click this link to contact our technical support team with questions.  

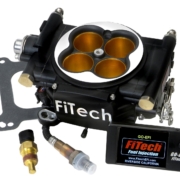
Example of FiTech Go-EFI Fuel Injection System

FiTech Go EFI

The revolution in electronically controlled fuel injection systems has dramatically changed the way that guys build cars.  Not much more than 10 years ago, carbs still reigned supreme.  EFI conversions were hard, required a lot of expertise and didn’t get you all of the performance that you really wanted.  Over the years, we have shown how easily our Infinitybox system can power and interface with the most popular EFI systems on the market.  We recently received an email from a customer asking how to wire the Infinitybox 20-Circuit Kit to the FiTech Go EFI 8 1200 Power Adder Plus.  Just like all the other EFI systems, this is easy.

There are blog posts and wiring diagrams on our website for many different EFI systems.  The FiTech Go EFI wires to the Infinitybox in the same way as other fuel injection systems.

Before you start wiring the FiTech EFI, you must thoroughly read and understand the instructions that came with your kit.  This link will take you to the Go EFI 8 1200 manual.  Note that this blog post is just going to cover wiring ignition power from your Infinitybox system, wiring the fuel pump & cooling fan.  Refer to the FiTech manual for the rest of the wiring details.

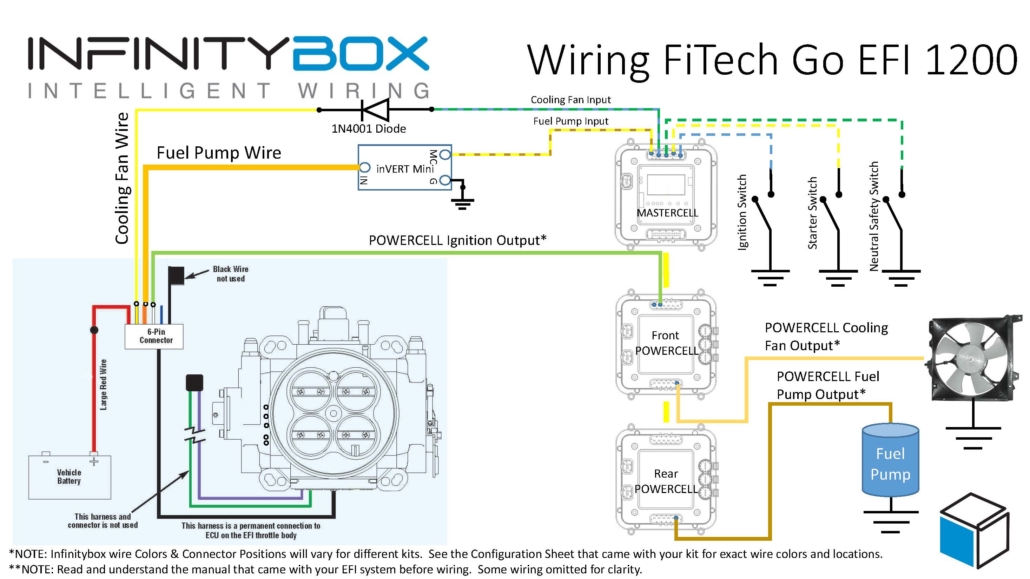
This diagram shows the connections between the FiTech Go EFI harness and the Infinitybox system.

Picture showing how to wire FiTech Go EFI Fuel Injection System with the Infinitybox System.

Picture showing how to wire FiTech Go EFI Fuel Injection System with the Infinitybox System.


First things first, you need to get battery power and ground to the FiTech harness.  The large red wire in their 6-pin connector must go directly to the positive terminal on your battery.

Next, you need to bring ignition power from your POWERCELL to the white wire in their 6-pin harness.  In most Infinitybox systems, the ignition output is the light-green wire on your front POWERCELL but check your configuration to be sure.  This POWERCELL output will supply battery power to the FiTech system whenever you have the ignition switch on.

Next, you need to connect your MASTERCELL input for your cooling fan to the yellow wire on the FiTech 6-pin harness.  You must install a diode in series between the MASTERCELL input and the cooling fan trigger on their harness.  We recommend a 1N4001 diode.  Note that the orientation of this diode is critical.  Check the diagram above for the correct orientation of the stripe on the diode.

There are several advantages to using the Infinitybox system to control the cooling fan directly off of the FiTech harness.  First, you do not need to add a relay.  That is built into the POWERCELL.  Second, our cooling fan outputs are set to soft-start the motor.  Click here to learn more about the benefits of soft-starting.

Next, it is time to wire the fuel pump.  The orange wire on their 6-pin connector is the fuel pump trigger.  This is a 12-volt signal so it cannot be directly connected to the MASTERCELL input for the fuel pump.  You must use an inVERT Mini to flip this 12-volt signal to a ground signal for the MASTERCELL.  This link will get you more details on the inVERT Mini.  The diagram above will show you how to wire the inVERT Mini between the FiTech Go EFI harness and your MASTERCELL fuel pump input.

There are several advantages of using the Infinitybox system to control the fuel pump directly from the FiTech harness.  First, we can disable the fuel pump as a security measure if you have our inLINK Radio upgrade.  More importantly, having the Infinitybox system control the fuel pump means that you  have to run less wire in the car.  The MASTERCELL is located close to the EFI system.  The rear POWERCELL is mounted near the fuel pump in the tank.  There is no extra fuel pump wiring required to make it work.

Wiring your FiTech Go EFI system with Infinitybox is simple and it gets you a powerful electrical system.  You can download a PDF version of this wiring diagram by clicking this link.

Click this link to contact our team with any questions.


Picture of the Holley Sniper EFI System

Wiring the Holley Sniper EFI

Until recently, electronic fuel injection was completely out of the hands of your typical automotive enthusiast.  Over the past years, many different companies have introduced powerful and elegant systems to bring the benefits of EFI to anyone.  Holley recently introduced their Sniper EFI system.  This is a cost-effective EFI system that can handle up to 650 horsepower and can be tuned without a laptop.  Wiring the Holley Sniper EFI system is a breeze with our Infinitybox 10-Circuit or 20-Circuit Kits.  This blog post will take you through the details.

Our Infinitybox system can interface with any electronic fuel injection system in the market.  Wiring the Holley Sniper EFI is as simple as wiring their Terminator or their Dominator.  Click on this link to get to the details of wiring the Holley Terminator.  Click on this link to get to the details of wiring the Holley Dominator.

Before you start wiring the Holley Sniper EFI, you must thoroughly read and understand the instructions that came with your kit.  This link will take you to the Holley manual.  Note that this blog post is just going to cover wiring ignition power from your Infinitybox system and wiring the fuel pump & cooling fan.  The Holley manual will cover the rest of the wiring details.

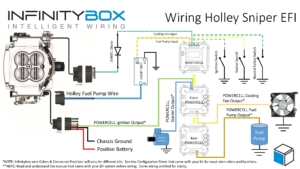
This diagram shows you the connections between your Holley Sniper EFI and your Infinitybox system.

Picture of the Infinitybox wiring diagram showing how to wire the Holley Sniper EFI System with the Infinitybox 20-Circuit Kit

Picture of the Infinitybox wiring diagram showing how to wire the Holley Sniper EFI System with the Infinitybox 20-Circuit Kit

First things first, you need to get battery power and ground to the Sniper.  The red wire in their 7-pin connector must go directly to the positive terminal on your battery.  The black wire in their 7-pin connector must go to ground.  As we discussed in other blog posts, 90% of all electrical problems relate to a bad ground.  Make sure that you have a solid metal-to-metal connection to your chassis with no paint, grease, powder coating or dirt in the way.

Next, you need to bring ignition power from your POWERCELL to the pink wire on their 7-pin harness.  In most Infinitybox systems, this is the light-green wire on your front POWERCELL but check your configuration to be sure.  This POWERCELL output will supply battery power to the Sniper whenever you have the ignition switch on.

Next, you need to connect your MASTERCELL input for your cooling fan to the light-blue wire on the Sniper 10-pin harness.  You must install a diode in series between the MASTERCELL input and the cooling fan trigger on the Holley harness.  We recommend a 1N4001 diode.  Note that the orientation of this diode is critical.  Check the diagram above for the correct orientation of the stripe on the diode.

There are several advantages to using the Infinitybox system to control the cooling fan directly off of the Sniper harness.  First, you do not need to add a relay.  That is built into the POWERCELL.  Second, our cooling fan outputs are set to soft-start the motor.  Click here to learn more about the benefits of soft-starting.

Next, it is time to wire the fuel pump.  The dark-blue wire on the 7-pin connector is the fuel pump trigger.  This is a 12-volt signal so it cannot be directly connected to the MASTERCELL input for the fuel pump.  You must use an inVERT Mini to flip this 12-volt signal to a ground signal for the MASTERCELL.  This link will get you more details on the inVERT Mini.  The diagram above will show you how to wire the inVERT Mini between the Sniper EFI harness and your MASTERCELL input.

There are several advantages of using the Infinitybox system to control the fuel pump directly from the Sniper harness.  First, we can disable the fuel pump as a security measure if you have our inLINK Radio upgrade.  More importantly, having the Infinitybox system control the fuel pump means that you  have to run less wire in the car.  The MASTERCELL is located close to the EFI system.  The rear POWERCELL is mounted near the fuel pump in the tank.  There is no extra fuel pump wiring required to make it work.

One quick note about the Sniper if you are using our One-Button Start feature.  It takes their system 2.5-seconds to boot up.  It is only after that time that the fuel-pump will start to prime.  Our standard One-Button Start feature is set for a 1-second fuel pump prime.  We can easily extend our fuel pump prime time to accommodate the timing required for the Sniper EFI system.  Please talk to Infinitybox technical support when you place your order to make this change.

Wiring the Holley Sniper EFI system with your Infinitybox 20-Circuit Kit will get you all of the functionality that you need to control your engine.  You can download a PDF of our wiring diagram by clicking this link.

Click this link to contact our team with any questions about how our Infinitybox system can streamline your wiring projects.

Wiring the AEM Infinity ECU

AEM Infinity ECU

AEM Infinity ECU

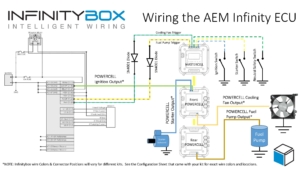
As we’ve blogged about before, our Infinitybox system easily integrates into any fuel injection or engine management system.  With our Infinitybox system and your ECU, you can easily power your engine management system plus seamlessly control your fuel pump and cooling fans.  We have a lot of different examples of wiring diagrams for different ECU’s.  You can get to them in the Resources section of our website by clicking this link.  This post is going to cover connecting your AEM Infinity ECU to your Infinitybox 20-Circuit Kit.

AEM has created a very powerful series of engine management computers and electronic fuel injection systems.  You can learn more about their product offering by clicking this link.  Before you start to wire their ECU, you must carefully read and thoroughly understand the instructions that came with your AEM Infinity ECU.  They have a very comprehensive set of instructions that walk you through the entire process.  Check their website for the specific manual for your ECU.

This blog post and wiring diagram are only going to cover the connections between your ECU and the Infinitybox system.  Specifically, this includes the ignition output that will supply key-on power to the ECU.  It will also include the details on the fuel pump and the cooling fan.  See the AEM manual for the rest of the wiring details.

The following diagram shows you all of the connections between the AEM ECU and the Infinitybox 20-Circuit Kit.

Picture of wiring diagram showing how to wire the AEM Infinity ECU with the Infinitybox 20-Circuit Kit

Picture of wiring diagram showing how to wire the AEM Infinity ECU with the Infinitybox 20-Circuit Kit

Please note that the wire colors and connector positions shown in this diagram are representation of a typical installation.  Reference the specific configuration sheet that came with your Infinitybox kit for the exact wire colors and connector positions.

The first connection that needs to be made is from the front POWERCELL to the Ignition Switched Power on the AEM ECU.  This is going to cavity 48 on the C1 connector on their harness.  When you turn on your ignition, you will get battery voltage on this pin of their connector.

The next connection is for the fuel pump trigger.  Connect the MASTERCELL input for your fuel pump to the PUMP terminal on cavity 41 on the C1 connector.  Note that you must add a blocking diode in series on this MASTERCELL input.  This can be a 1N4001 diode.  The orientation of this diode is critical for correct operation of the fuel pump.  Check the wiring diagram for the proper orientation of this diode.

Once you have the MASTERCELL input wired for the fuel pump trigger, connect the fuel pump output from the rear POWERCELL to your pump.

When the ECU sends the signal to turn on the fuel pump, the MASTERCELL input will get the trigger.  The MASTERCELL will send a command to the rear POWERCELL to turn on the fuel pump.  This lets you eliminate the fuel pump relay in the AEM harness and eliminates the need to run a separate fuel pump wire to the back of the car.

The last connections are for the cooling fan trigger.  Connect the MASTERCELL input for your cooling fan to the FAN terminal on cavity 21 on the C1 connector.  Note that you must add a blocking diode in series on this MASTERCELL input.  Like the fuel pump input, this can be a 1N4001 diode.  The orientation of this diode is critical for correct operation of the cooling fan.  Check the wiring diagram for the proper orientation of this diode.

Once you have the MASTERCELL input wired for the cooling fan trigger, connect the cooling fan output from the front POWERCELL to your fan.

When the ECU sends the signal to turn on the cooling fan, the MASTERCELL input will get the trigger.  The MASTERCELL will send a command to the front POWERCELL to turn on the cooling fan.  This lets you eliminate the cooling fan relay in the AEM harness.

Please note that you must keep the EFI MAIN RELAY in the AEM harness.  Follow their wiring instructions for this relay.

You can download a PDF of this wiring diagram by clicking this link.

You can contact one of our technical support engineers by clicking here if  you have any questions about this wiring diagram or anything else related to wiring your car with our Infinitybox system.

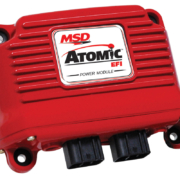
Picture of the MSD Atomic EFI Module

Atomic EFI

We’ve blogged before about how to power many different EFI systems with Infinitybox.  Examples include the Ford Coyote ECU, the GM LS ECU, the Holley Dominator, the FAST EZ-EFI and many others.  This post is going to cover how to wire the Atomic EFI system from MSD.

Here’s what MSD says about their Atomic EFI:

“The Atomic EFI provides the performance and driveability benefits that you expect from fuel injection. Quick starts, smooth idle and great throttle response just to name a few. Combine the fact that the Atomic will support ignition timing through the ECU and you have a win-win combination. Initial timing is handled through a compact handheld monitor where you simply answer a few car guy questions about your engine and you’re off and running!”

Just like any other EFI system, wiring it with our Infinitybox 10 or 20-Circuit Harness Kit is very easy.  You get several advantages over wiring with a traditional wiring harness.

  • You run less wire in the car.  The ECU sits behind the dash and connects to the MASTERCELL.  The cooling fan and fuel pump are wired to their local POWERCELLs.  You’re not running wires from the ECU all over the car.
  • You can eliminate the need for relays and external fuse holders.  The POWERCELLs are your relays.  Each output is fused inside the POWERCELL.
  • You get security and immobilizer functions in your Infinitybox system.  You don’t have to add a separate alarm system to keep unwanted people from starting your car.
  • You can get cooling fan timing and delays right in the Infinitybox system.  You don’t need to add separate controller modules.

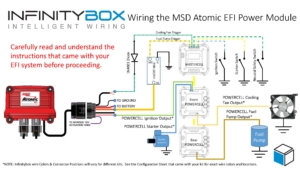
Before you connect your Infinitybox system to your Atomic EFI system, you must completely understand the instructions from MSD.  Click on this link to get to the manual for their Atomic EFI PN 2910 – Throttle Body Kit.  This post is going to show you how to wire the key-on power to the Power Controller.  It will also show you how to wire ground, constant battery power, the fuel pump trigger and the cooling fan trigger.  See the MSD manual for the rest of the electrical connections to their harness.

This diagram will show you the details of wiring your MSD Atomic EFI system to your Infinitybox system.

Picture of wiring diagram showing how to wire the MSD Atomic EFI Power Module with the Infinitybox 20-Circuit Kit

Picture of wiring diagram showing how to wire the MSD Atomic EFI Power Module with the Infinitybox 20-Circuit Kit

To start, you need to connect constant power and ground to the MSD Power Module harness.  MSD recommends connecting the large red wire directly to the battery.  The ground wire should get connected to the chassis through a metal-to-metal connection.

The small red wire is the key-on power wire to the Power Module.  When you key is in the on or start position, you should have battery voltage on this wire.  The small red wire in the MSD harness is going to connect to the ignition output wire on your POWERCELL.  Check the configuration sheet that came with your kit for the correct color and connector orientation for all of the POWERCELL connections.

There are two wires in the MSD Power Module harness for cooling fan triggers.  The pink wire is the primary and the tan wire is for the secondary cooling fan.  Both of these wires are intended to ground a relay coil to turn on the fan.  You can connect them directly to the MASTERCELL inputs.  The MASTERCELL inputs are expecting a ground trigger to turn on the inputs.  You must put a diode in-line between the Power Module fan trigger wires and the MASTERCELL input wires.  This should be a 1N4001 diode.  The orientation of this diode is critical for this to work properly.  See the diagram above for correct orientation of the diode.

Once you have the MASTERCELL input wired to the Power Module for the cooling fan trigger, you need to connect the POWERCELL output to your cooling fan.  See the configuration sheet that came with your kit for the proper wire color.  If you want to use a secondary cooling fan, you can use any of the OPEN outputs on your system.

There is a large orange wire on the Power Module harness for the fuel pump.  This wire puts out a positive signal for the fuel pump.  You will need to invert this signal to a ground signal to work properly with the MASTERCELL.  You can use a relay to do this.  This link will show you how.  The easier way to do this is to use one of our inVERT Mini‘s.

Once you have the MASTERCELL input for the fuel pump properly connected to the MSD Power Module fuel pump output, you need to wire your POWERCELL output to your fuel pump.  Again, your configuration sheet will shows which wire to use.

That’s it.  All of your relays and fuses are built into the Infinitybox system.  Once you follow these steps, you’re ready to power up your system and start tuning the engine.

You can download a PDF copy of this wiring diagram by clicking this link.

Contact our technical support team with any questions related to wiring the MSD Atomic EFI system with your Infinitybox system.

Picture of the Speartech LS-58X Engine Harness

Speartech LS-58X

Our Infinitybox wiring system can interface with practically every engine management system in the aftermarket.  This post is going to show you how to connect your 10 or 20-Circuit Kit to the Speartech LS-58X engine harness.  LS swaps are one of the most popular transplants in resto-mods, street rods and Pro-Touring builds.  Connecting your Infinitybox system to the Speartech LS-58X harness is pretty straight forward.

We get a lot of questions about how our Infinitybox wiring system connects to the ECU.  We don’t control the engine.  That is what the ECU does.  We power the ECU.  We can also take commands from the ECU to control external functions like the cooling fan and fuel pump.

In the case of the Speartech LS-58X engine harness, your Infinitybox system is going to provide the switched key-on ignition power.  It will also take the triggers for the cooling fan and the fuel pump from the ECU.  That way you can use the Infinitybox system to eliminate the need for external relays for your fuel pump and cooling fans.

Before you get any further, please read and understand the manual that came with your Speartech LS-58X harness.  This link will take you to the wiring details from Speartech.  Also, make sure you are familiar with your Infinitybox system.

In this post, we are only going to discuss connecting battery power, ignition power and the triggers for the cooling fan and fuel pump.  Follow the Speartech instructions for the rest of the connections to your ECU and engine.

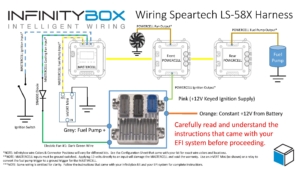
To begin, you have to connect the Orange wire in the Speartech harness directly to your battery.  Follow their instructions for proper connections and proper fuse sizes to protect this wire.

Next, you need to connect the ignition output from your POWERCELL to the Pink wire in the Speartech LS-58X harness.  This is ignition power from the POWERCELL.  When you turn the key to the ignition position, you will get battery voltage to the ECU.

Next, connect the Grey Fuel Pump + wire from the Speartech harness to the MASTERCELL.  This is a positive trigger for the fuel pump so it must be inverted to a ground signal to connect to the MASTERCELL input.  You can use one of our inVERT Minis to do this.  Alternately, you can use a relay to invert this signal.  Click on this link to learn how to use a relay to do this.  You must not connect the MASTERCELL input directly to the Fuel Pump Trigger from the Speartech harness.  This will damage your MASTERCELL input and void the warranty.  Check your configuration sheet for the exact wire colors for your fuel pump trigger.

Last, you need to connect your cooling fan trigger from the MASTERCELL to the Speartech harness.  Check your configuration sheet for the wire colors for your cooling fan input.  The Speartech ECU ground triggers the cooling fan outputs.  That means that you can connect the MASTERCELL input wire directly to the Speartech harness.  The primary cooling trigger from Speartech is the Dark Green wire in their harness.

We strongly recommend soldering a 1N4001 diode in between the MASTERCELL input wire and the EFI system trigger wire for the cooling fan.  This isolates the MASTERCELL from the EFI system.  Diodes are directional parts so you must wire them with the cathode side facing towards the ECU.  That is the side of the diode that has the stripe on it.

The Speartech LS-58X harness has provisions to control two cooling fans.  You can use any OPEN POWERCELL output on your system to control your second cooling fan with the Speartech harness.  Wire the Dark Green wire from the Speartech harness, through the diode as described above, to the MASTERCELL input wire for your second cooling fan.  This way, the Speartech harness will control your primary and secondary cooling fans through your Infinitybox system without having to add relays.

This picture shows the details of wiring the Infinitybox System to the Speartech LS-58X Engine Harness.  Please note that Infinitybox wire colors may vary based on different configurations.  See the configuration sheet that came with your kit for the specific wire colors.

Picture of the Infinitybox wiring diagram showing how to wire the Spear LS-58X Engine Harness

Picture of the Infinitybox wiring diagram showing how to wire the Spear LS-58X Engine Harness

You can download a PDF version of this wiring diagram by clicking this link.

Click this link to contact our team with any questions about wiring your car or truck with our Infinitybox system.

Holley Terminator EFI

Our Infinitybox system can power any ignition and fuel injection system out there.  We recently received a request for a wiring diagram for the Holley Terminator EFI system.  We’ve blogged before about the Dominator and given detailed instructions on how to wire that system with our 20-Circuit Kit.  You can see that here.  This post will cover how to connect to the Holley Terminator EFI system with our 20-Circuit Kit.

Holley ECU

Holley ECU

Holley Terminator EFI System

This link will take you to more information on the Holley Terminator EFI system.  

Our Infinitybox 20-Circuit Kit is going to provide the ignition power to the Holley ECU.  It is also going to take the fuel pump trigger signal from their ECU and the cooling fan trigger.  These two triggers will go to the MASTERCELL which will send signals to the POWERCELL in the front of the car for the cooling fan and the POWERCELL in rear of the car for the fuel pump.  This eliminates the need to add external relays because they are switched from inside the POWERCELLs.  This also eliminates the need to run high-current wiring from the Holley Terminator EFI system to the front and back of the car.  Those signals are sent through our CAN cable.

Before we go any farther, it is very important that you completely read and fully understand the manual that came with your Holley Terminator EFI system.  There are many different parts of properly installing this system, the wiring is just one step.

Once you have read and understand their manual, you must make all of the constant power and ground connections necessary for their system to work.  There are multiple constant power feeds that must be wired directly to the battery and multiple ground connections.  You must also wire in all of the other connections including the coil, tach, O2 sensors, etc.  Their manual will cover these details.

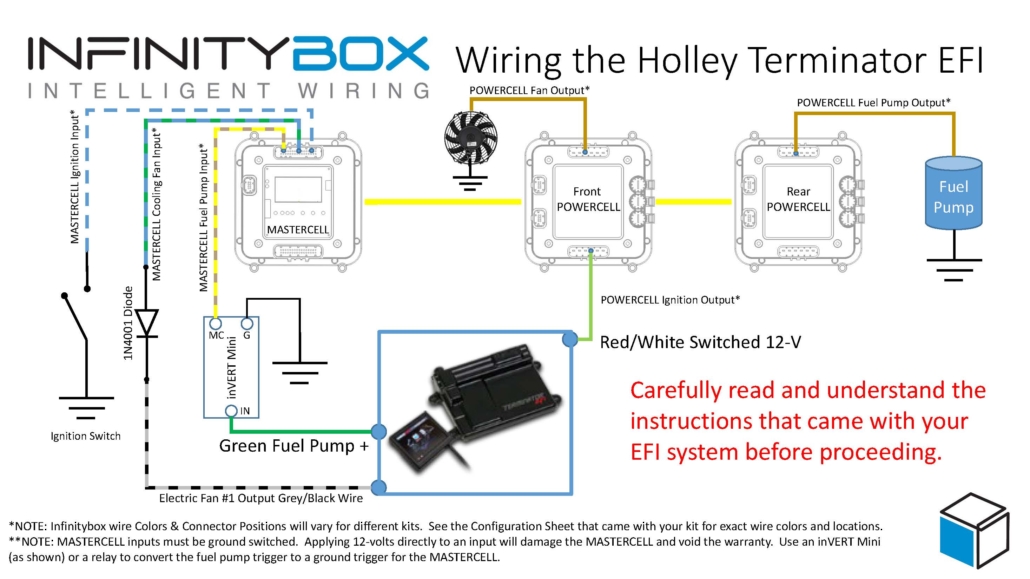
As an overview, here are the points where your 20-Circuit Kit will connect to the Holley Terminator EFI system.

  1. The ignition output on your POWERCELL will supply the key-on power to their system.
  2. Their system will trigger the fuel pump output on your rear POWERCELL from the MASTERCELL.
  3. Their system will trigger the cooling fan output on your front POWERCELL from the MASTERCELL.

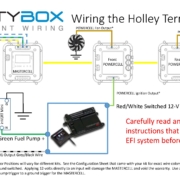
This picture shows you the overview of the connections between your Infinitybox 20-Circuit Kit and the Holley Terminator EFI system.

Picture of Infinitybox wiring diagram showing how to wire the Holley Terminator with the 20-Circuit Kit.

Picture of Infinitybox wiring diagram showing how to wire the Holley Terminator with the 20-Circuit Kit.

You can download a PDF of this wiring diagram by clicking this link.

Let’s start with the key-on ignition power.  Check your configuration sheet and find the ignition output wire.  In most cases, this is the light-green wire on the front POWERCELL.  System configurations may vary so check the configuration sheet that came with your kit.  The POWERCELL ignition output wire is going to connect to the red wire with the white stripe in the Holley ECU harness.

Next, you need to connect the fuel pump trigger.  In the ECU harness, there is a green fuel pump wire.  This wire supplies 12-volts to drive a pump directly or to drive a relay coil.  To connect this to the MASTERCELL input, you must convert this 12-volt signal to a ground signal.  You can do this with one of our inVERT Mini’s.  Alternately, you can use a relay to flip this 12-volt signal to a ground signal for the MASTERCELL.  This link will take you to a diagram showing you how to use a relay if you don’t want to use an inVERT Mini.

Check the configuration sheet that came with your kit.  Find the MASTERCELL input wire for your fuel-pump.  In most cases this is input 19 which is the tan wire with the yellow stripe.  Check your configuration sheet to confirm this as different systems may have different wire colors.

Lastly, you need to wire the cooling fan trigger from the Holley Terminator EFI system to your MASTERCELL.  Check your configuration sheet for the color of this wire.  In most systems it is the blue wire with the yellow tracer.

There are additional outputs on the Holley harness.  The gray wire with the black stripe is the cooling fan trigger.  This is a ground-switched signal so you do not need to flip it to connect it to the MASTERCELL.  However, we do recommend using a diode to eliminate the chance of surges coming into the MASTERCELL inputs from the ECU.  A 1N4001 diode will do the job.  You can get these from any electronics source.  Please note that the orientation of the diode is very important.  The stripe on the diode should be on the ECU side of the connection, facing away from the MASTERCELL.

That’s it.  When you turn the key, the front POWERCELL is going to apply battery power to the ignition input on the Holley Terminator EFI system.  When the Terminator wants the fuel pump to turn on, it will send a signal to the MASTERCELL, which will control the fuel pump through the rear POWERCELL.  When the Terminator wants to turn the cooling fan on, it will send a signal to the MASTERCELL.  The MASTERCELL will tell the front POWERCELL to turn on the cooling fan.

If you have questions about wiring diagram or wiring anything else with our Infinitybox system, click on this link to contact a member of our team.

Ignition

In our last post, we talked about wiring the starter solenoid to the POWERCELL in your 20-Circuit Kit.  Now it is time to wire the ignition.  There is a dedicated output on your POWERCELL that supplies battery voltage for your ignition.  This is your “key-on” power.  In this post, we are going to talk about wiring the POWERCELL output.  We’ll discuss wiring the MASTERCELL input to the ignition switch in later posts.

Our Infinitybox system can power any type of ignition system.  It can be a basic set of points or a highly sophisticated EFI system.  In either case, we are going to power the ignition system when the key is on.  In the case of this 1967 Mustang, the customer is using the Ford Coyote Crate Motor with the Ford ECU.

Check the configuration sheet that came with your kit.  It will define which output is for the ignition.  In most cases, it is the light-green wire on the front POWERCELL.  This is output 3 on the B connector.

You need to carefully read the instructions for your ignition system.  In most cases, there will be a wire that needs to connect directly to the battery to give it constant 12-volt power.  There will also be a key-on or ignition power feed.  That will come from the light-green wire on your POWERCELL.  Over the years, we have accumulated many different wiring diagrams for different ignition systems.  They can be found in posts on our blog or in our reference library.  We’ll highlight some of the most popular in this post.

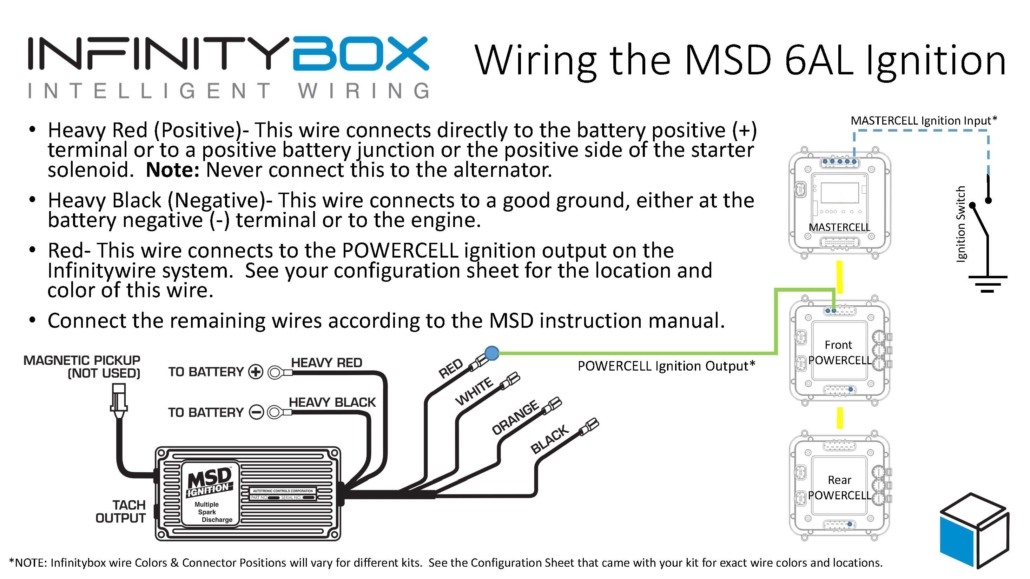
The most common ignition system that we see customers using is a ignition box from MSD.  The MSD 6A or 6AL are some of the most popular.  There is a heavy red and heavy black wire in their harness.  These wires need to connect directly to the battery and to chassis ground, respectively.  Then there is a lighter gauge red wire that is for the key-on power.  This will connect to the ignition output on your POWERCELL.  See the picture below for more details.

Image of wiring diagram showing how to wire the MSD 6A with the Infinitybox system.

Image of wiring diagram showing how to wire the MSD 6A with the Infinitybox system.

This link will take you to a blog post talking in more detail about wiring an MSD ignition box to our POWERCELL.

We also have many different posts that talk about how to wire the ignition outputs to EFI systems.  This picture shows wiring our ignition outputs to the FAST EZ-EFI system.

Picture of wiring diagram showing how to wire the FAST EZ-EFI fuel injection system with the Infinitybox system.

Picture of wiring diagram showing how to wire the FAST EZ-EFI fuel injection system with the Infinitybox system.

Our ignition output from the POWERCELL connects to the pink wire in the EZ-EFI harness.  You can read the entire blog post on the FAST wiring at this link.

Another popular option for our customers is the Holley Dominator EFI system.  This link shows you a picture of how to wire that into our system.

Image of wiring diagram showing how to wire the Holley Dominator EFI System with the Infinitybox System.

Image of wiring diagram showing how to wire the Holley Dominator EFI System with the Infinitybox System.

In the case of our customer’s 1967 Mustang, they are using the Ford Coyote crate engine for this car.  We have a complete schematic that shows you how to connect the ignition output from the POWERCELL to the ECU.  You can see that schematic at this link.

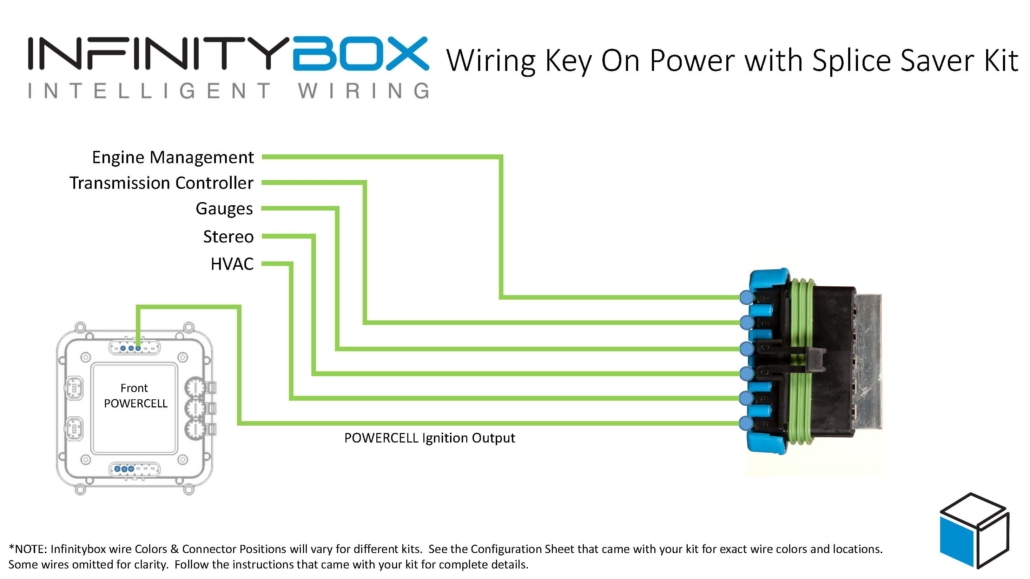
Once you have your ignition system or EFI system wired to the ignition output, you also have to think about the other things that you want to come on with your ignition switch.  Remember that each POWERCELL output has the capacity of 25-amps.  You can use this single output to power many different functions.  You are going to use this same ignition output to power your gauges, your transmission controller, your radio power or any other function that you need to power with ignition.

In earlier posts in this series, we talked about how to splice off of POWERCELL outputs for multiple taps.  These examples included your headlights, high-beams and parking lights.  For your ignition, we recommend creating a ignition bus that you can use to power the many different switched functions in your car.  You can use a terminal strip to create a common point for your ignition functions.

You can purchase terminal strips like this from companies like Del City and Waytek Wire.  Make sure that you pick a terminal strip that has an insulating cover on it.  You want to make sure that you protect these wires from getting shorted to ground.

Another option is to use our Infinitybox Splice Saver Kit.  This is a simple accessory that makes connecting a POWERCELL output to multiple wires robust and reliable.  This picture shows you how you can use the Splice Saver Kit to create a sealed junction point for everything that needs to get powered off of your ignition.

Wiring ignition key-on power with the Infinitybox Splice Saver Kit

Wiring ignition key-on power with the Infinitybox Splice Saver Kit

Please contact us with questions about wiring the ignition output on your Infinitybox system.  Click this link to reach out to a member of our team.